Implementing a Silent Updating Process

For many applications, it is not desirable to leave the decision of whether or not to update an application to the end-user. In fact, it is sometimes desirable to craft an updating process that operates silently, with no user interaction at all. AppLife Update makes it very easy to implement such an update process. In this blog post, I’ll walk through implementing a silent updating process.

The Process

When our demo application starts up, we’ll check for updates asynchronously in the background. If an update is available, we’ll asynchronously download the update in the background. To make the process the least intrusive to the user, our process won’t take any action when the download completes. Since the downloaded update package is cached locally as it downloads, it will be available the next time the application is restarted. Upon application startup, we’ll check to see if an update is fully downloaded and if so, go ahead and apply the update. If the update is not yet fully downloaded, the download will pick up where it left off.

Handling Unexpected Errors

Many things can go wrong as we check for and download updates over a network, and since our process is being performed silently, we’ll need to handle any errors that occur and decide what to do about it.

We’ll also need to be able to identify errors during the silent update execution. When an update is applied, our application is shutdown so that the application assemblies can be replaced. When the update process finishes, the application is restarted automatically. During startup, we’ll look at the results of the last update to see if any errors occurred. If any errors occurred, we can inform the user or send an administrative notice to support.

Now that we have a plan, we can go forward with implementation.

Implementation

With the desired behavior identified, we’ll implement this updating process using AppLife Update. To start, we’ll create a new Windows Forms application and add an Update Controller to the main form from the AppLife Update toolbox palette.

The Update Controller application programming interface (API) will provide all of the functionality we need to accomplish our identified update process. Once the update controller is added to your form, go ahead and set up a new project using the control smart tag. This will create an AppLife Update project that you’ll use to create and publish updates for your application.

Note: The Update Controller does not need to reside on a form. You can create an Update Controller and configure it programmatically in any .Net application.

Now that we have an Update Controller in the application and a project setup, we’ll implement our desired update process.

Checking For Updates

To check for updates, we’ll use the CheckForUpdateAsync method on the Update Controller. This check is performed asynchronously, and when the check completes, the CheckForUpdateCompleted event is raised.

   1: using Kjs.AppLife.Update.Controller;  
   2:    
   3:    
   4: public Form1() {  
   5:   InitializeComponent();  
   6:    
   7:   //check for updates  
   8:   updateController1.CheckForUpdateCompleted +=   
   9:    new CheckForUpdateCompletedEventHandler(  
  10:      updateController1_CheckForUpdateCompleted);  
  11:   updateController1.CheckForUpdateAsync();  
  12: }  
  13:    
  14: void updateController1_CheckForUpdateCompleted(object sender,  
  15:   CheckForUpdateCompletedEventArgs e) {  
  16:   if(e.Result == true) {   
  17:     //An update is availabe  
  18:    
  19:   }  
  20: }  

After the check completes, we can check to see if the update is already downloaded by inspecting the IsDownloaded property of the update. If the update is downloaded, we can go ahead and apply the update. If it is not, we’ll initiate the download. The download will pick up from where any previous instance left off. When the download process completes, the DownloadUpdateCompleted event will be raised. We won’t take any action when the download completes, but we will use this event for error handling later. We are not showing download progress in this implementation, but there is also a DownloadUpdateProgressChanged event to monitor download progress.

 1: public Form1() {  
   2:   InitializeComponent();  
   3:    
   4:   //check for updates  
   5:   updateController1.CheckForUpdateCompleted +=   
   6:    new CheckForUpdateCompletedEventHandler(  
   7:     updateController1_CheckForUpdateCompleted);  
   8:   updateController1.DownloadUpdateCompleted +=  
   9:     new AsyncCompletedEventHandler(  
  10:     updateController1_DownloadUpdateCompleted);  
  11:   updateController1.CheckForUpdateAsync();  
  12: }  
  13:    
  14: void updateController1_DownloadUpdateCompleted(object sender,  
  15:    AsyncCompletedEventArgs e) {  
  16:   //Download completed. Ready to apply on next startup.  
  17: }  
  18:    
  19: void updateController1_CheckForUpdateCompleted(object sender,  
  20:    CheckForUpdateCompletedEventArgs e) {  
  21:   if(e.Result == true) {   
  22:     //An update is available  
  23:     if(updateController1.CurrentUpdate.IsDownloaded == true) {  
  24:       //the update is already downloaded, go ahead and apply it.  
  25:     } else {   
  26:       //start the download  
  27:       updateController1.DownloadUpdateAsync();  
  28:     }  
  29:   }  
  30: }  

Applying the Update

With the update downloaded, we can apply the update. We want to apply the update silently, so we’ll pass in a parameter that prevents the update window from being displayed. This method call will close the application, launch the update process, and restart after the update completes.

   1: void updateController1_CheckForUpdateCompleted(object sender,   
   2:    CheckForUpdateCompletedEventArgs e) {  
   3:   if(e.Result == true) {   
   4:     //An update is availabe  
   5:     if(updateController1.CurrentUpdate.IsDownloaded == true) {  
   6:       //the update is already downloaded, go ahead and apply it.  
   7:       updateController1.ApplyUpdate(ApplyUpdateOptions.NoUpdateWindow);  
   8:     } else {   
   9:       //start the download  
  10:       updateController1.DownloadUpdateAsync();  
  11:     }  
  12:   }  

That’s it! We have implemented a silent update process, and in a perfect world we’d be done. But we don’t live in a perfect world, and unexpected events occur. Since this process is completely silent to the user, we’ll need to prepare for error conditions programmatically and take appropriate actions.

Error Handling

Handling errors that occur during the update check and download process is straightforward. The asynchronous event handlers can check for errors that occurred and look at the specifics of the error to aid in determining how to handle the error. If you are using the http protocol for updating, the inner exception is probably a WebException class, which provides additional error information. For instance, this information could be used to ignore connectivity errors. For this demonstration, we’ll display a message box if any errors occur during the update check or download process.

   1: void updateController1_DownloadUpdateCompleted(object sender,  
   2:    AsyncCompletedEventArgs e) {  
   3:   //Download completed. Ready to apply on next startup.  
   4:   if(e.Error != null) {  
   5:     //An error occurred.  
   6:     if(e.Error is DownloadException) {  
   7:       //A download exception is thrown when something unexpected happens.  
   8:       //The InnerException property will hold the exception that occurred.  
   9:       string errorMsg = "";  
  10:       if(e.Error.InnerException != null) {  
  11:         errorMsg = e.Error.InnerException.Message;  
  12:       } else {  
  13:         errorMsg = e.Error.Message;  
  14:       }  
  15:       MessageBox.Show(  
  16:        string.Format("An error occurred downloading an update: {0}",  
  17:         errorMsg));  
  18:     }  
  19:   }  
  20: }  
  21:    
  22: void updateController1_CheckForUpdateCompleted(object sender,  
  23:    CheckForUpdateCompletedEventArgs e) {  
  24:   if(e.Error != null) {  
  25:     //An error occurred.  
  26:     if(e.Error is DownloadException) {   
  27:       //A download exception is thrown when something unexpected happens.  
  28:       //The InnerException property will hold the exception that occurred.  
  29:       string errorMsg = "";  
  30:       if(e.Error.InnerException != null){  
  31:         errorMsg = e.Error.InnerException.Message;  
  32:       }else{  
  33:         errorMsg = e.Error.Message;  
  34:       }  
  35:       MessageBox.Show(  
  36:      string.Format("An error occurred checking for updates: {0}",  
  37:        errorMsg));   
  38:     }  
  39:   }  
  40:        …  
  41:   

Detecting a Failed Update Execution

As an update is executed, the application being updated is shutdown. When an update is executed with a user interface, any errors that occur would be presented to the user through the visual updating interface. Since we are applying this update silently, we will need to inform the user of any errors that occur another way. After the update completes, the application is restarted. We can use methods of the Update Controller to easily investigate the results of the last update that was applied. We’ll use this method to look up what happened, and inform the user of any errors that occurred.

   1: InitializeComponent();  
   2:    
   3:   //check for updates  
   4:   updateController1.CheckForUpdateCompleted +=   
   5:    new CheckForUpdateCompletedEventHandler(  
   6:     updateController1_CheckForUpdateCompleted);  
   7:   updateController1.DownloadUpdateCompleted +=   
   8:    new AsyncCompletedEventHandler(  
   9:     updateController1_DownloadUpdateCompleted);  
  10:     
  11:   //Read last update results  
  12:   LastUpdate lastUpdate = updateController1.ReadLastUpdateInformation();  
  13:   if(lastUpdate != null &&  
  14:    lastUpdate.Result == UpdateResult.Failure &&   
  15:    lastUpdate.StartingVersion == updateController1.Version) {  
  16:     //An update failed. Prompt the user.  
  17:     if(MessageBox.Show(string.Format(  
  18:    "An unexpected error occurred while silently applying an update:  
  19:   {0}\n\nWould you like to retry the update?",  
  20:     lastUpdate.ErrorText), "Update Error", MessageBoxButtons.YesNo) ==   
  21:     DialogResult.Yes) {   
  22:       //launch an interactive update  
  23:       updateController1.UpdateInteractive(this);  
  24:     }  
  25:   } else {   
  26:     updateController1.CheckForUpdateAsync();  
  27:   }  

Conclusion

Using the AppLife Update API, you can quickly and easily implement a non-interactive silent updating process that can be used in any .Net application. The application checks for, and downloads updates asynchronously. When the application launches and an update has been fully downloaded in a previous session, the update is applied silently. If any errors occur, the user is notified. The example can be easily extended and improved as necessary to fit specific updating requirements.

How to Hide the Error When Out of Network Range

All of the visual updating controls that ship with AppLife Update show an error icon and message whenever an update check fails.  Sometimes though this isn’t the most desirable behavior.  For instance, if your application runs on a laptop that is frequently moving in and out of network coverage.  In a situation like this, an update check failure is expected and you probably don’t want to display a concerning error icon to your end user.

To address this, we can look at the results of an update check and check to see why the error occurred.  If the issue is a network connection error, and we expect spotty network connectivity, we can choose to hide the control, instead of displaying an error to the user.

By listening for the CheckForUpdateCompleted event of the Update Controller, information about the error can be inspected and we can hide the control if a connectivity issue is discovered.

   1: private void updateController1_CheckForUpdateCompleted(object sender,  
   2:    Kjs.AppLife.Update.Controller.CheckForUpdateCompletedEventArgs e) {  
   3:   if(e.Error != null &&  
   4:     e.Error.InnerException != null &&  
   5:     e.Error.InnerException is WebException) {  
   6:     WebException ex = e.Error.InnerException as WebException;  
   7:     if(ex.Status == WebExceptionStatus.NameResolutionFailure ||  
   8:       ex.Status == WebExceptionStatus.ConnectFailure) {  
   9:     //There is connectivity issue.   
  10:     //Hide the update control, instead of showing an error.  
  11:       this.updateDisplay1.Visible = false;  
  12:     }  
  13:   }  
  14: }  

Another Alternative

It might be more preferable to display the control but show that no updates are available. We can accomplish this as well by including with the application a Director.Xml file that contains no updates.  Just copy the Director.Xml file from your publish location and remove all Versionnodes. With this file present, instead of hiding the control, we can change the update location to the local application path and initiate another update check.  This time no updates will be found and the control will indicate this.

   1: Kjs.AppLife.Update.Controller.CheckForUpdateCompletedEventArgs e) {  
   2: if(e.Error != null &&  
   3:   e.Error.InnerException != null &&  
   4:   e.Error.InnerException is WebException) {  
   5:   WebException ex = e.Error.InnerException as WebException;  
   6:   if(ex.Status == WebExceptionStatus.NameResolutionFailure ||  
   7:     ex.Status == WebExceptionStatus.ConnectFailure) {  
   8:     //There is connectivity issue.   
   9:     //Start an update check that will not find an update.  
  10:     string appDir = Path.GetDirectoryName(Application.ExecutablePath);  
  11:     this.updateController1.UpdateLocation = appDir;  
  12:     this.updateController1.CheckForUpdateAsync();  
  13:   }  
  14: }  

With no network connectivity, this is what is displayed to the user.

These techniques can be used with any of the visual updating controls and provides a method

Customizing the Application Updating User Interface

For many software teams who integrate a commercial application updating solution, the user experience that comes out of the box is perfectly acceptable. But for others, it’s one of the major barriers preventing solution adoption. The ability to customize the user experience is a differentiator for AppLife Update over competing options. We provide turn-key visual controls and user interfaces for an application updating process right out of the box, just like the others. Where we are different, is that we also provide the ability for you, the integrator, to completely customize the end-user updating experience. We’re not talking about changing the background color, or adding an image. We’re talking complete customization. In this post, I’ll walk through implementing a facelift customization of the AppLife update engine user interface.

The Built-In User Interface

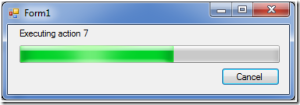
As an update is executing on a deployed client, the image above is what the end-user sees. The window title and the image displayed are easily customizable through simple project property settings. It’s also just as trivial to silently update and not show any interface at all through update implementation code:

this.mUpdateController.ApplyUpdate(ApplyUpdateOptions.NoUpdateWindow);

Replacing the Built-In User Experience

Notice on the project settings tab above, the option to use a Customized Replacement Window.

This is what lets us give this user experience a real face lift. As an update is being executed and the AppLife Update engine is executing, there is a defined contract, or interface, that the visual window adheres to. Let’s introduce this interface.

Meet the IUpdateUI interface.

Any class that implements the IUpdateUI interface located in the Kjs.AppLife.Update.Engine.Core.dll assembly can replace the built-in window. This interface is quite simple. It has five methods and four events.

Methods – These methods are called by the update engine as the update is executed.

  • Open
    Displays, or initializes, the user interface.
  • Close
    Closes the user interface. This method will not always be called by the update engine. The update engine will call this method after the Finishmethod, only if the host application code initiated the update with the AutoClose option. Close is also called immediately after the Finishmethod if an error occurs during the update. Otherwise it is expected that the user interface remain open until the user closes it.
  • Finish
    Called by the update engine to notify the update user interface that the update has finished and is allowed to be closed. The user interface should not be allowed to be closed before this method is called.
  • Update
    This method is called repeatedly as progress is made during the update process. The method is called in order to refresh the user interface. Method parameters provide information about the current state of the update process.
  • ShowYesNoPrompt
    Display the designated message and prompt the user for a yes or no answer. This method is used by built-in action, such as the Restart Operating System action.

Events – These events are raised by the customized update interface to communicate with the update engine.

  • Closed
    Raise this event when the UI has been closed. This event must be raised for the Update Engine to complete the update and shutdown.
  • RequestCancel
    Raise this event when the user desires to cancel an executing update. The cancel request is confirmed by the update engine through a Finishmethod call. The result parameter will be set to Cancelled.
  • RequestPause
    Raise this event when the user desires to pause the executing update. The pause request is confirmed by the update engine through an update method call. The uiState parameter will be set to Paused.
  • RequestResume
    Raise this event when a paused update should be resumed. The resume request is confirmed by the update engine through an updatemethod call. The uiState parameter will be set to Updating.

That’s the interface that we must implement in order to replace the built-in updating window. You can use Windows Form, a WPF Window, or you can even use a communications proxy class that knows how to marshal the updating process information to a supervisory application, such as an update manager. For this walk through we’ll create a Windows Form replacement.

  1. Create a new Windows Forms project. Make sure to target the same .Net Framework version as your host application. Name the project MyCustomUpdatingForm.
  2. Add a reference to the assembly Kjs.AppLife.Update.Engine.Core.dll. If AppLife Update is installed on your development computer, this assembly will be in the .NET list.
    image
  3. View the code on Form1 and extend this form to implement the Kjs.AppLife.Update.Engine.Core.IUpdateUI interface.
       public partial class Form1 : Form, IUpdateUI {  
       ...  
       }  
    
  4. Design and layout your update user experience. As the update progresses, there are text messages and percent completion updates that you can use in the design. You can design anything you like. This is your form. For simplicity, this walkthrough will use a label and a progress bar in a much smaller form factor than the built-in updating window.
    Add a label near the top of the form and name it lblMessage. Then set AutoSize to false, AutoEllipse to true, and anchor to Top, Left, Right.
    Next add a progress bar below the label. Size it to fill the width of the window and set its Anchor property to Top, Left, Right.
    Finally, add a cancel button below the progress bar and name it btnCancel.
    image
  5. Implement Interface Methods

Open. In this method, we’ll simply show the form.

1:   public void Open(Kjs.AppLife.Update.Engine.Core.UpdateUIContext context) {  
2:     this.Show();  
3:   }  

Close. The Form base class already implements a Close method that will close the form. We do want to interact with the form close logic to prevent the form from closing before the update engine calls the Finish method. To accomplish this, we’ll override the OnClosing method and check a member variable that we’ll add. This member variable will be used to signal that the Finished method has been called. We’ll also keep the update interface open in the event of an error to show the user information about the error.

 private bool mCanClose;  
   2: private bool mError;  
   3:   
   4: protected override void OnClosing(CancelEventArgs e) {  
   5:   base.OnClosing(e);  
   6:   
   7:   if(!mCanClose) {  
   8:     e.Cancel = true;  
   9:     if(mError == true) {  
  10:       mCanClose = true;  
  11:     }  
  12:   }  
  13: }  

Finish. After the Finish method is called, the user interface can be closed. This is signaled by setting the mCanClose member variable to true. Then, if the update did not fail, the form is closed. If the update did fail, the exception message is shown on the form.

 1: public void Finish(Kjs.AppLife.Update.Engine.Core.UpdateResult result,   
   2:   string description, Exception updateError) {  
   3:   
   4:   if(updateError == null) {  
   5:     mCanClose = true;  
   6:     Close();  
   7:   } else {  
   8:     lblMessage.Text = result.ToString();  
   9:     progressBar1.Visible = false;  
  10:     btnCancel.Enabled = false;  
  11:     lblMessage.AutoSize = true;  
  12:     lblMessage.Text = "Error: " + updateError.Message;  
  13:     mError = true;  
  14:   }  
  15: }  

Update. Update the progress bar and message label.

   1: public void Update(Kjs.AppLife.Update.Engine.Core.UpdateUIState uiState,  
   2:  Kjs.AppLife.Update.Engine.Core.UpdateState updateState,   
   3:  string description, int progressValue, int progressMaximum) {  
   4:   
   5:   progressBar1.Maximum = progressMaximum;  
   6:   progressBar1.Value = progressValue;  
   7:   
   8:   lblMessage.Text = description;  
   9: }  

ShowYesNoPrompt. The simplest method is to show a message box.

   1: public YesNoResponse ShowYesNoPrompt(string message) {  
   2:   YesNoResponse result = YesNoResponse.No;  
   3:   if(DialogResult.Yes == MessageBox.Show(this,  
   4:                message, "Update",   
   5:                MessageBoxButtons.YesNo,  
   6:                MessageBoxIcon.Question)) {  
   7:     result = YesNoResponse.Yes;  
   8:   }  
   9:   
  10:   return result;  
  11: }  

6.  Implement Cancel by raising the RequestCancel event when the Cancel button is clicked.

 private void btnCancel_Click(object sender, EventArgs e) {  
   if(RequestCancel != null) {  
     RequestCancel(this, EventArgs.Empty);  
   }  
 }  

7. Implement the Closed event. This event informs the update engine that the user interface has closed. A Windows Form class raises a Closed event when the form is closed, so we don’t need to implement the event in this example.

Testing the New User Interface

With the basics of the interface implemented, we can build the project and then test our form using Make Update. Open your AppLife Update project file and then navigate to the project settings dialog.

On the Update Window tab, we can import the assembly that includes our new replacement window. The imported assembly must have only one class that implements the IUpdateUIinterface. The assembly is imported into the update project and will be included in any new update packages built by this update project. This dialog also provides a tester for replacement windows. Once imported, clicking the Test button will launch a test process.

In conclusion, by using the IUpdateUI interface you have complete control over the look and feel of your updating user experience. If your application demands strong product branding or a specific look and feel, you can easily fulfill your requirements with AppLife Update.

Application Updating by File Patching or Replacement

There are many update actions available in AppLife Update to manipulate files on deployed systems during a software update. You’ll see in the list of update actions, that there are actions to replace files, and also actions that patch files and folders. When would you choose a patching action over a replacement action? What’s the difference anyways?

Replacing Files

Update actions that add & replace files will place the complete and intact file into the update package during the update build process, and then as the update package is executed on a deployed client, the intact file is extracted from the update package and replaces the existing previous version.

Patching Files

Actions that patch a file or folder do not place the entire file in an update. Instead, during the update build process a difference file is generated by comparing an earlier revision of a file with the current revision and this difference file is added to the update package. Difference files are often much smaller than a complete file, which results in a significantly smaller update package. As the update is executed on the deployed system, the difference file is combined with the earlier version to reproduce the current version file.

Advantages & Disadvantages

Replacing files makes an update far less dependent on the specific version of the application being updated on the deployed client. For many applications, using replacement file actions allows their update to successfully update any previous version. In this scenario, once a new version update is published, previous updates are no longer necessary and can be removed from the update server.

The advantage of patching files is that update packages can be significantly smaller in physical size.

The disadvantages of both types are converse to their advantages. Replacing files results in much larger update packages. The disadvantage of patching actions is very stringent versioning requirements.

So when would you choose one over the other? Here are a few factors that can contribute to this decision.

1. Are specific file versions reliably present?
If the specific version of a target file cannot be guaranteed based on the installed version number of the application, patching cannot be used. The difference file must be combined with the exact base file used to create it. If that exact file is not present on the deployed system, the new file cannot be created during the update process and the action will fail.  This situation can occur when end users might manipulate the files and assemblies in the application installation directory.

2. If the files to update are physically small, the number of clients to update is small, or network bandwidth is not a concern, consider using file replacement actions.
In general, file replacement actions are more robust due to the lack of specific file versioning requirements. In addition, because updates can target many previous versions, clients that do not regularly update their software as updates are published will apply fewer updates.

3. To minimize update package size, use patching actions
Applications with many deployed clients, or physically large files should consider using patching actions. A Patch Folder action can operate recursively on an entire folder structure, making it easy to patch the entire application with a single update action. When using patching actions, it is necessary to build your updates to target specific previous versions.

4. Consider combining both patching and replacing
For some applications, certain files can be safely patched while others cannot. Both file action types can be used in a single update.

Wrapping it up, with AppLife Update you have a choice to patch files or replace files during an update. Patching creates much smaller update packages, but requires strict adherence to versioning. Replacing files creates larger update packages but is far more forgiving and allows a single update to target multiple previous versions. So choose the right strategy or your application and start updating!

Build and Publish Software Updates from Visual Studio

So you’ve got AppLife Update integrated into your application. That was easy enough. You’ve got your AppLife Update project set up to build and publish updates from Make Update as you release software versions. To make the process of building your updates even easier, I’ll show you how to integrate update building and publishing directly into your Visual Studio project build process.

AppLife Update ships with an MSBuild task that we can use within a Visual Studio project file to build and publish updates as part of the Visual Studio build process. Using this, we’ll add a new Release with Update build configuration to a Visual Studio project. When this build configuration is chosen, an application update will be built and published as the Visual Studio project builds.

Start by extracting the Simple C# Quick Start project. This will give us a common project to work from.

Step 1 – Create a new build configuration.

From the Visual Studio build menu, select the Configuration Manager.

Create a new build configuration and call it Release with Update. Select to copy settings from the existing Release configuration. We’ll modify the project to build and publish an update when this configuration is built.

Step 2 – Modify the Visual Studio Project File

From the Visual Studio project menu, select to Unload Project. With the project unloaded, you can edit it within Visual Studio by selecting the Simple project node from the Solution Explorer and from the context menu, select to Edit Simple.csproj. With the Visual Studio project file open in the editor, scroll to the bottom and you will see two commented out Target elements. Uncomment the AfterBuild target and add a UsingTask element that references the assembly that houses the BuildUpdate MSBuild task. This assembly is located in the AppLife Update install directory.

Inside the AfterBuild target, add a BuildUpdate task. Set the Condition attribute to execute only when the newly created build configuration is used. Details on the attributes of this task are available in the MSBuildTask ReadMe.rtf file located in the same folder.


Step 3 – Modify the aup project file to use the Release with Update output folder

The Add & Replace files action should look at the Release folder for its files. Add a path relative to the aup project file.

Simple\bin\Release\Simple.exe

That’s it!

Now, whenever you want to publish an update, you can select the Release with Update build configuration and build the project.

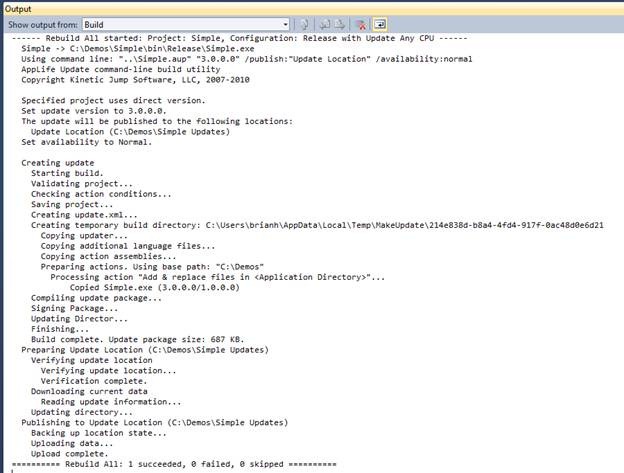
Visual Studio Build Output

Parting Thoughts

Build a test update out of Visual Studio, or build to a test update location. Both options are just as easy. This prevents an inadvertent build from being available to end users, and provides a built in updating testing mechanism.

To build a test update, set the TestOnly attribute to true. For clients to see test updates, they must have a specific application setting in their app.config file.

To publish to a specific test update location, you can name the publish location in Make Update project settings, then change the PublishLocations attribute value to match this update location.

Application Updates and Mayhem

Have you seen the Allstate mayhem commercials? They are pretty good. If you haven’t seen them, take a few seconds and watch the video below. At this point, you may be asking yourself what does that have to do with software. But then again if you’ve been around awhile, you may not be… These spots have a lot in common with software because in software, mayhem is everywhere.

As a software developer, if you are not finding bugs, you’re fixing them. Mayhem. As a user, unexpected behaviors often occur as you go about using the software you use. Mayhem. And as an administrator, you spend a lot of time working around unexpected issues. Mayhem.

And so it is with maintaining deployed applications, or automatic application updating. In a perfect world, an application update would never fail. Most don’t. And most houses don’t catch fire either, yet we buy insurance just in case. Around here, we put a lot of effort into ensuring that when a software update is applied, one of two outcomes will result. A successful update, or a complete rollback. We prefer the former, but plan for the later. And for most actions rolling back, and preparing for the rollback that hopefully will never occur, requires more development work than the execution of the action. Let’s look at files. Protection from mayhem is almost all of the work involved in file actions. The first thing we do is verify that our update process has permissions to replace the file. If we don’t, there is no sense in proceeding. We can stop before doing anything, preventing mayhem. Then we back up the file, including the assigned permissions, just in case mayhem happens later on, we can restore the original file. Such is the case with all of the built-in updating actions. With the exception of the Install .Net 4.0 Framework action, they either complete their work or rollback completely. For that action, mayhem is better avoided by leaving the framework successfully installed than to remove it during a rollback.

Our Adjuster

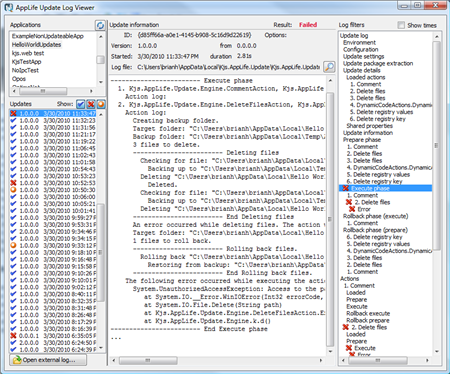
When mayhem happens, insurance companies like Allstate will send out an adjuster to determine the cause and extent of the damage. Our adjuster equivalent is the update action log files. When mayhem occurs, there are few things worse than having to tell your boss, “I don’t know why that happened”, because that means you also don’t know the answer to the inevitable next question. “How are we going to prevent it from happening again?” Update action logs tells the story of what happened (or didn’t happen) during an update, and with an update log you’ll know what happened and be able to determine how to prevent it from happening again.

If your house burns down, we can’t help much. Hopefully you have Allstate for that. But for protecting your software updates from mayhem, look to AppLife Update. You’ll be in good hands.

To be Automatic, or be Automated – There is a difference

A developer doesn’t have to look very hard to find an application that employs automatic updating.  In fact, there’s a good chance that an icon down in the system tray right now is informing you of an update’s availability. Some applications tell you ahead of time that updates are available, and some tell you after the fact that an update has been applied. Some are painstakingly obnoxious to the user, and some completely transparent. For most desktop applications, employing a system of automatic updating makes perfect sense.  But for many applications, especially applications consisting of services, server components and databases, automatic updating isn’t very desirable.  But almost always, an automated update process does make sense, and should be employed.

If your application is deployed to more than one location and development is ongoing, then the application should include an automated means to find updates and apply them.  Not always automatic, but always automated. There is a difference. An automated update process won’t just happen on its own, and it often doesn’t even inform the user when an update is available.  It’s there to provide a simple, consistent, single step process to update the installed software. Customers will thank you, and it cuts your support costs.

If your responsible for back office software, you’ve no doubt had the unpleasant experienced of reviewing a software update procedure.  Software you installed a year ago, and haven’t thought of since.  You first have to re-familiarize yourself with software terminology and configuration before you can even make sense of the upgrade procedure. Time consuming.

And if your a developer, you’ve no doubt written an upgrade procedure, supported customers as they perform the upgrade, then tweaked the procedure for better understanding.  Time consuming.

AppLife Update provides the means to automate your application maintenance plan, and could make a significant impact on support costs, especially if your application upgrades involve a multi-step manual upgrade process. Even if your application is complicated, don’t assume that implementing an automated update process would be cost prohibitive.  If you were to start from scratch, it probably would be, but with the built-in actions in AppLife Update, along with the Dynamic Code Action providing the means to write and package up application-specific upgrading functionality, you’ll be automated in no time.

AppLife Update and .Net Deployment Strategies

To deploy .Net applications, there are two primary activities that must be accomplished.  The application must be initially deployed (installation), and a deployed application must be maintained (update).  The two Microsoft technologies offered to accomplish these goals are the Windows Installer and ClickOnce.  The Windows Installer is a very powerful technology designed specifically to deploy software onto the Windows platform.  For many developers though, the Windows Installer can be very challenging to utilize. In fact, there are many third party vendors competing with each other to simplify the developer’s interactions with the Windows Installer, each providing their own Windows Installer abstraction layer.  While the Windows Installer is flexible and can accomplish most any installation goal, it lacks easy maintenance features (updating), comes with heavy technical resource requirements and expects a lot from the end user, most notably administrative privileges.

The challenges of application deployment strategies utilizing the Windows Installer, and the emergence of the web application combined to influence the creation of ClickOnce.  With ClickOnce, Microsoft attempted to bring the deployment simplicity of a web application to WinForms and WPF applications. And to a large degree, they succeeded.  For many applications ClickOnce does provide the best deployment strategy available.  But it’s not for all applications, and because of the huge void in deployment capabilities between ClickOnce and the Windows Installer, many teams find themselves pushing the envelope of one or both technologies in order to accomplish their goals. For applications in that void, AppLife Update can add a tremendous amount of value to a deployment strategy.

AppLife Update is generally used in conjunction with a Windows Installer, though its flexibility does provide for the ability to initially deploy applications without using an MSI.  Many of our customers adopt AppLife Update after first trying ClickOnce. Here are the primary reasons given for moving away from ClickOnce:

  1. Difficulty in moving applications. For developers who can publish directly the final deployment location, ClickOnce is very easy to use. But for teams who need to build at one location, and publish at another, ClickOnce is harder to manage. Development teams with QA and testing requirements also struggle with the same challenges in moving applications through their release process.
  2. Desire to install per machine. With ClickOnce, applications are installed per user.  For organizations that utilize roaming profiles, this means that applications are often installed many times on the same machine.
  3. Need for side-by-side installs.  With ClickOnce, installing different versions of an application on the same machine is challenging.
  4. Extensive installation requirements.  While it is possible to install ClickOnce application prerequisites using an MSI, the ease-of-use that ClickOnce offers is compromised, and these applications often push other limits of ClickOnce, such as security requirements.
  5. Network Environment.  Development teams whose applications target public audiences over the internet face browser incompatibility issues, plug-in requirements, proxy server challenges, the need for publicly recognized code signing certificate authorities, and security sandboxing issues.  What’s worse is that initial ClickOnce testing usually passes with flying colors, but as the application use proliferates, costly support issues arise as users run into these problems.

When development teams incorporate AppLife Update into their application deployment strategy, they get:

  • Flexible API / Extensibility.
    AppLife Update is not a black box. The API is extensive and allows for application-specific manipulation of the update process, from start to finish.
  • Versatile Hosting
    Updates can be hosted on any server (file, ftp, web) and freely moved around to support varying deployment and testing strategies.
  • Do anything during an update
    Any updating activity can be performed during an update. ClickOnce replace files, but AppLife Update includes actions to perform registry work, config file manipulation, register COM, Start/Stop Services, execute MSI major, minor upgrades, patches, etc. There is even a dynamic code action where defined .Net code is compiled during an update build and executed during an update.
  • Customized Look and Feel
    The entire look and feel of the update process is customizable. Use the built-in updating interface, customize it, or completely replace it.
  • Permissions Elevation
    Applications installed into Program Files cannot be updated by limited users. For applications that target controlled desktops, this is a huge maintenance hurdle. By utilizing AppLife Update’s Windows Service to securely elevate permissions during the update, the application can update itself, even when launched by a limited user.

AppLife Update provides the functionality to quickly and easily integrate application maintenance features into a .Net application, bridging the application deployment gap between Windows Installer deployed applications, and ClickOnce maintained applications.

For more information visit the AppLife Update product page, forums, Solution Lab, send us an email, or give us a call. (612) 486-9653.

Pros and Cons of File Patching, Update Chaining, vs Broader Multi-Version Application Updates

Say you have a .Net application.  From a deployment perspective, your application is a relatively normal application.  A primary executable, probably Windows Forms or WPF based, a class library or two, and a few third party controls.  The application has reached a shipping point and now it’s time to distribute it to more than a few workstations.  You’ve chosen to distribute your application using the Windows Installer.  You’re now faced with determining the strategy for maintaining the workstations that have installed your application.  Whatever strategy you choose to pursue, you will be confronted with this question:

When I update my application, do I replace all of my assemblies, making updating simple, or do I replace only what I just changed, making updates smaller, but more complicated?

This question is going to arise whether you create Windows Installer upgrades and patches, use a third party updating solution, or even consider rolling your own updater.  Regardless of the tool you use, at some point you will find yourself pondering the topic.  The physically small update is the apparent no-brainer.  The uninitiated may say, “of course we want our updates small.  Nobody wants to wait on updates, and we don’t want to waste bandwidth.  Net neutrality isn’t here yet!”   This is all true, and can be a compelling argument. So you march forward on the task… until the details emerge.  To keep updates small, versioning rears its ugly head.  An incremental update can only target specific previous versions.  For manually distributed software updates, as is often the case with Windows Installer deployments, knowing what version you have, and which patch, or patches, you need to apply becomes as big a deterrent to end-user updating as a larger update.

After considering the challenges of implementation, the simplicity of larger, but version agnostic updates will cause you to reconsider your seemingly obvious initial plan. This is a big reason why so many organizations start out attempting to distribute patches and incremental upgrades, but then revert to the far more common version agnostic approach of uninstall/re-install. (There are plenty of technical challenges involved in actually producing working Windows Installer upgrades and patches, which also plays a role here as well).

So which path do you choose?  Consider the following.

  • Frequency of updates

    If you are creating updates frequently, you want the update process creation to be as automated as possible. Decreasing the manual involvement increases efficiency as well as lowers the opportunity for mistakes. If you have the infrastructure to automate the creation of small, incremental updates then you should do so. If not, your update process will be simpler and less prone to error if you build larger, version agnostic updates. Even if you are doing this frequently.

  • Frequency of application use

    For applications that are launched and updated infrequently, accumulating incremental updates can create an undesirable user experience. Try to avoid forcing your users to regularly discover and apply multiple updates, one right after another. You should build larger updates that apply to more versions, or ensure your update process can apply multiple individual updates in a single update session.

  • Physical size of the application files

    Physically large application assemblies make for large updates. File patching can significantly reduce this size of an update, but requires strict control of which previous versions can apply the update.

  • Number of deployed clients

    For applications with many thousands of deployed clients, the network burden of larger updates is much more significant than applications with tens or hundreds of deployed clients. As your installed user base grows, minimizing the physical size of each update becomes far more important in order to manage your server bandwidth utilization without resorting to throttled update deployment.

  • Network Environment

    The network speed between the update server and deployed clients can dictate your decisions, especially when slow links are known to exist. When your application lives within slow networks, smaller updates are more desirable.

  • Background Download to Reduce the Burden

    Downloading updates in the background and informing the user when an update is ready to apply removes much of the burden the user experiences with larger updates.  It doesn’t remove the burden from the network though.

  • Infrequent Exceptions to the Norm

    Targeting multiple versions, and making exceptions when you need to update infrequently modified files, such as third-party tools and help documentation keeps the initial update implementation effort low, ongoing update creation simple, and minimizes the burden that updating places on the end-user.

    A commonly pursued solution to this updating dilemma

    is not to consider application updating as an in incremental progression, but rather a “synchronization” process.  A process where deployed workstation application files are kept in-sync with a master version located on a server.  This approach works well if the updating process only updates files. It doesn’t work so well when application maintenance also requires performing other updating activities, such as registry and data store maintenance.  Security and licensing concerns also make the “sync” approach more challenging and less desirable than version migration approaches.

    Our updating solution, AppLife Update, is an incremental updating solution.  Each update is self-contained, and includes all of the updating logic and new files/assemblies needed to migrate a deployed application from a previous version to a new version.  When an update is created, you get to choose which previous versions can successfully apply the new update.  You can target all previous versions, a list of discrete versions, or all greater than a previous version.  How you’ve defined the update obviously determines which previous versions you can target.  When defining an update, you have a lot of latitude in your decisions.  You can package and deploy Windows Installer databases, you can replace whole files, you can individually patch existing files, you can use update actions that automate the determination of which files need to be updated.  With an update system like AppLife Update, there is little difference in the effort needed to create updates that target all previous versions, or just the most recent version, however the bandwidth and user experience factors still need to be considered.

    The flexibility is there to create the application updating strategy that best fits your application and your organization.  If the size of the update package necessary to replace all of the assemblies built in a standard upgrade of your application is acceptable, your update process will be far simpler to create and maintain if you target all previous versions with each update.  If the factors involved with your application dictate smaller updates, you can easily extend your updating process to seamlessly discover and download multiple updates, as well as display to the user a unified updating experience.

    Scroll to Top